How Roof Coating Works & Why It’s Essential for Buildings in Hawaii
- By Gopet
- 10 COMMENT
Storms can damage any building, but with a roof coating you may never need repairs again. Roof coatings are excellent for protecting buildings from water and wind-related damages that could lead to costly maintenance or even replacement of parts.
The Roof Coating Process
A roof coating is a specially formulated liquid membrane that’s applied by professionals in the field of exterior and/or interior painting. It typically consists out silicone or epoxy, which can be used together with basic tools like rollers & brushes before application to your desired surface area; this will allow them do their job more effectively than if they were just using one type alone without any others available for assistance! Once everything has dried after application (if done right!), homeowners may find themselves protected against physical damage caused through rain hail storms etc., making sure not only does anything inside stay dry but also external factors such as UV rays too – so no need worry anymore!!
A special kind Of material called “roof coatings” exist nowadays
The Advantages of the Service
One of the best things you can do for your home is protect it with a roof coating. Not only will it extend the life of both what’s on top and underneath, but heavy rain or severe storms often damage roofs enough that leaks happen which lead to water damage requiring expensive repairs later down the line if left unchecked–a Roof Coating stops this in its tracks by creating an protective barrier against anything trying get through!
Roof coatings can provide many energy-saving benefits to your building. They help cool the interior during hot day, and reduce power costs through reflective properties that keep sunlight off of a roof’s surface during daytime hours – it is less heated! This means lower utility bills for you too!.
If you’re interested in a specialty roof coating, contact the knowledgeable team of Maui roofing.
PUP TENT
- By Gopet
- 137 COMMENT
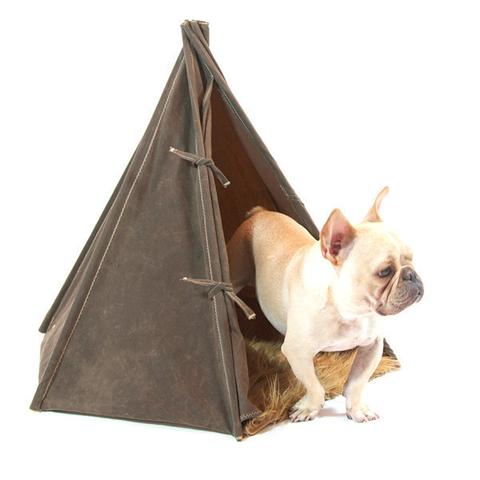
Pup Tent Dark Tan American Made Waxed Canvas
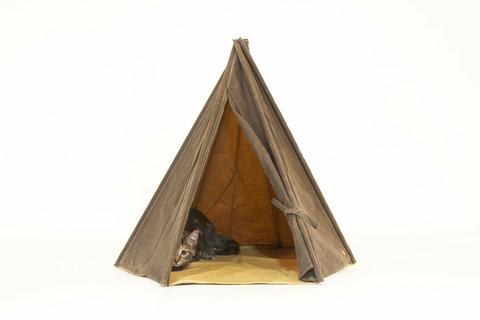
Small Pup Tent ( cats and teacups ) Dark Tan American Made Waxed Canvas
CAT / PLAY
- By Gopet
- 67 COMMENT
Bella the Rockin Laser Bird
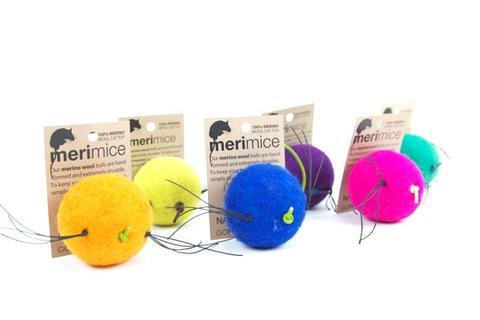
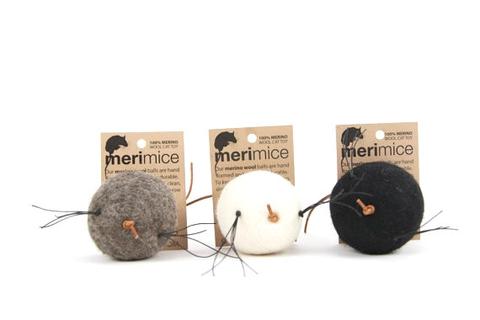
MeriMICE x3
Mod MeriMICE x3
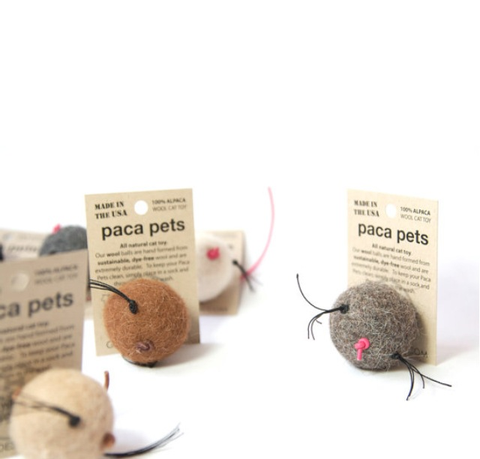
pacaPET natural alpaca cat toy
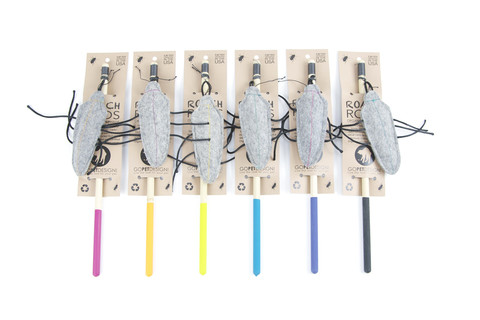
roachROD industrial felt catnip teaser toy

ScrappyRAT
eiCrate Fitted Cover
- By Gopet
- 79 COMMENT

eiCrate Fitted Cover
Form Fitting Cover for the eiCrate
MATERIAL
Cover Is made of double backed Jersey Cotton
SIZE
One Size Fits All
FEATURES
› Gives a whole new look
› Keeps the Chill Out
CRATE TRAINING
- By Gopet
- 84 COMMENT
You have just come home from a long day at work, looking forward to seeing your favorite canine friend. While he is there jumping happily to see you, you also notice a “present” left on your priceless oriental rug. If you hate coming home to these types of surprises, you may want to consider crate training for your pup.
It is important to understand that crate training does take considerable time and patience, however, it is a highly effective method in the training of dogs. If you have a new puppy or dog in the house, you will want to limit their access to the house until they know what they can and cannot do, such as chewing and eliminating. If you use a crate to train your dog, they will consider it their safe place and go there on their own.
The Crate Training Process
Be prepared to spend several days or weeks on the process of crate training depending upon the age and experiences of your dog. There are two things you need to keep in mind while crate training. Crates should be a pleasant experience and never used for punishment. Additionally, always start the training with baby steps. Never try to train your dog beyond its capabilities.
Introducing Your Dog To A Crate
One of the most important aspects is choosing a location for the crate where there is much activity in the house. Additionally, you should place a towel or soft blanket in the crate. Using a happy voice, bring your dog over to the crate and introduce them to it. Make sure that the door to the crate is fully open and secure in the fact that it will not close suddenly on the dog.
In an effort to encourage the dog into the crate, play some treats nearby, then closer to the door, and eventually inside of the crate. If the dog refuses to enter the crate, never push or yell at them. Keep tossing treats into the crate until the dog enters the crate on its own in an effort to get the treats. At the dog is not interested in the treats, consider throwing its favorite toy inside of the crate. This part of the process can take a couple of minutes to a number of days.
Feeding Meals Inside Of The Crate
Once a dog has been fully introduced to the crate, begin feeding meals near it. This is going to help create a good feeling with the crate. If the dog has already begun entering the crate on its own, you can place the food dish at the back of the crate. If the dog is still reluctant to enter the crate, place the food bowl as close to the entrance without him becoming too anxious or fearful. With each passing feeding, continue placing the food dish a little further into the crate.
When the dog is standing comfortably inside of the crate eating, you can close the door. If this will be the first time closing the door, be sure it is opened as soon as the meal is finished. After each successive feeding, allow the door to remain closed for just a few minutes longer, until you have reached 10 minutes after eating. If the dog begins to whine, you have increased the time at too quick of pace. At the next feeding, allow him to remain in a crate for a lesser period of time. If the dog begins to whine or cry while in the crate, it is important that he is not let until stoping. Otherwise, your dog is going to associate whining with being allowed out of the crate.
Conditioning The Dog For Longer Crate Times
Once a dog has been eating regular meals in the crate without any fear, it is time to allow him to stay in there for shorter periods of time. Throughout the day call into the crate and offer a treat. Use a simple command such as “crate” and encourage him inside of the crate with the treat and pointing inside. Once the dog has entered the crate on his own, offer the treat and close the door. Sit close to the crate for about 10 minutes and going to another room for a couple of minutes. Return to the room quietly after a couple of minutes, and allow him out of the crate. This process should be repeated several times throughout the day. With each process be sure to increase the length of time that the dog is left in the crate and the amount of time you are out of the room. When the dog is able to stay in the crate for about 30 minutes without whining, it is now possible to leave him crated for short amounts of time or allow him to sleep there for about the night. This process may take several days or weeks depending upon your dog.
Crating Your Dog While Left Alone
Once your dog is able to spend about 30 minutes in the crate without becoming fearful, it is now time to allow him short periods of time while you leave the house. Begin by placing them in the crate with a regular command and treat. Additionally, for the first time, you may want to leave a few extra toys in the crate. Also, in order to keep your dog from getting anxious, you may want to vary your getting ready to leave routine You do not want your dog crated for too long before you leave however, he can be crated before 5 to 20 minutes before you leave.
It is important that you do not make your departure too emotional but do it in a matter-of-fact way. Simply praise your dog and offer a tree and leave quietly. When you arrive home, do not reward your dog for acting in an excited way. It is important that all arrivals are kept quiet and low-key in an effort to avoid increasing anxiety. During this time period, you’ll still want to continue crating your dog for shorter periods of time while your home so he does not begin associating the crate with being left alone.
Crating The Dog At Night
Begin by placing the dog in the crate with the regular command and treat. At the start of this process, you may want to place the crate in the bedroom or in a nearby hallway, this is especially true if you have a puppy. Puppies will generally need to eliminate throughout the night and you will want to be able to hear your puppy when he needs to go outside.
Likewise, older dogs should be close by so they do not associate the crate with complete isolation. Once your dog is able to sleep comfortably and quietly for the night, you can begin to slowly move the crate back to its original location or simply consider having a day location and a night location.
Potential Problems
Too Much Time In The Crate
It is important to understand that the crate is not a dog’s permanent home. If the crate is not used in a correct manner, it may begin to feel trapped and frustrated. If a dog is kept in a crate all day while you’re at work and then throughout the evening while sleeping, this is entirely too much time in the crate. There will need to be other arrangements created in order to meet his emotional and physical needs. Additionally, puppies under the age of six months should never be created for more than free or four hours at a time. There is no way for them to control their bowels and bladders for that long of a time.
Whining
If you have a dog that cries and whines throughout the night while in a crate, it is difficult to understand if he needs out to eliminate or simply wants out of the crate. If you have followed the train and that we have outlined, your dog has not been rewarded for whining once it has been released from the crate. If this is so, you’ll simply need to ignore the whining for the time being. If this is a test by your dog, he will eventually stop. Never yell or pound on the crate as this is simply going to make the situation worse. If the whining continues after you have already ignored him, use the phrase he associates with going outside. If he responds to that phrase and becomes excited, he simply needs to go outside. Just be sure that your dog understands this is for illumination and not playtime. If you are not convinced that the dog needs to eliminate, just continue to ignoring until the whining stops. Never give into your dog as this will teach them that whining louder will get them what they want. If you’ve taken all of the training steps at a gradual pace, you’ll be less likely to have this problem.
Black eiCrate
- By Gopet
- 78 COMMENT
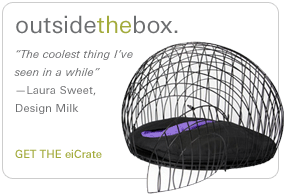
Black eiCrate
Designed by Peter Pracilio for designGO! Brooklyn, New York
FEATURES
› 2 Secure Locks
› Easy To Clean
› Each Piece Handmade
› Removeable leak-proof liner
› Indoor/Outdoor use
› For dogs 4-30 lbs
MATERIAL
Crate in powder-coated steel wire, Crate mat/liner is 100% rubber
SIZE
Total height 24.5” Total width 36”, Depth 34”, Door Height 14.5”
* Breaks down into two halves for shipping/storing